Here at Creative Arts Workshop (CAW), the pottery classes and studio are focused on helping you find your personal way with clay, exploring form, surface, color and much more.
We have everything you’ll need to excel at the craft: clays, glazes, slips, wheels, tools, books, teachers—and most importantly, a supportive atmosphere. All you need is the time, effort and patience. Even if progress is slow in the beginning, but working with your hands in clay brings great satisfaction. You’ll be building on over 45,000 years of human history and achievement.
This page contains lots of useful information about taking a pottery class at CAW and using the pottery studio, including an overview of how the studio functions and the equipment operates, as well as studio policies and etiquette. Please take the time to become familiar with this information to ensure a smooth, safe experience, for yourself and for the other people sharing the studio.
Note that CAW is a smoke-free building. Alcoholic beverages are also prohibited, except during gallery receptions and end-of-term class parties.
Storage Space
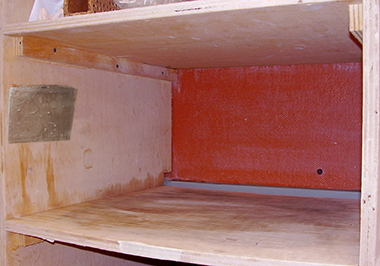
Each class has a designated section of shelves in the studio to store their work. The typical shelf is 12 inches high, 22 inches wide and 23 inches deep. Each student is entitled to one shelf. Your instructor will facilitate the selecting of shelves.
You’ll find the shelves clean and empty when you begin the semester, and you should leave them that way for the next student when the semester ends.
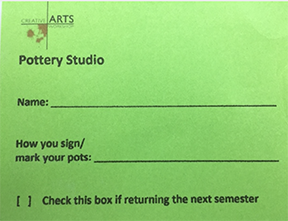
Mark your shelf by filling out the shelf label provided by your teacher and placing it into the plastic sleeve stapled to the side wall of the shelf. The card includes your name and the initials or other signing symbol that you use to mark your ware, as well as a checkbox to indicate that you will be returning to the same class during the following term.
Each student is entitled to one card and one shelf.
Returning students may retain their shelves across terms except during the August recess (see below). If you are enrolled in the same class for the following semester, then mark your card accordingly and place some masking tape across the front of your shelf at the end of your last class to identify yourself as a returning student.
August Recess
Every year during August, the pottery studio is given a thorough cleaning. For this reason, nothing may be stored on your shelf or in the building during the CAW August recess. Anything remaining in the building during that period may end up being discarded during our year-end studio clean-up.
Tools

Your instructor will let you know if there are any tools necessary for your class. A set of basic tools is contained in the start-up kit ($26.00). You can buy this set from your instructor or from a studio potter during class and practice times. A variety of individual tools are also available; check with your instructor or a studio potter.
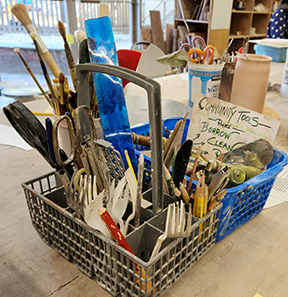
There are also some common tools available for everyone to use in a bin on the large table in the main pottery studio area.
Many students keep their tools in a bag or small toolbox in their storage bin. Putting your name on the toolbox will help get it back to you if it becomes misplaced.
Make sure not to forget your tools in a water bucket, or by the sink during clean up. Since everyone uses similar looking tools, they can get mixed-up or lost if you don’t keep track of them. It’s a good idea to check that you have all your tools before leaving the studio.
Tools left on benches or tables or in the sink area are often put in the orphan tool drawer in the glaze table.
Clay
CAW offers 5 types of clay:
- Brown Stoneware: High fire (cone 10)
- Dark Stoneware (Miller 75): High fire (cone 10)
- White Stoneware: High fire (cone 10)
- Porcelain: High fire (cone 10)
- Red Terracotta (earthenware): Low fire (cone 05)
Students may not bring outside clay into the studio. Only clay provided by or purchased from CAW can be used.
“High fire” and “low fire” refer to the kiln temperatures needed to properly fire this clay (during the second, glaze firing), and the cone numbers further indicate the exact temperature range (more info here). These clay bodies are inherently different; they have unique handling qualities and firing properties. Thus, terracotta must never be submitted for a Cone 10 firing because it will collapse, melt and lead to destruction in the neighboring area of the kiln.
When first starting out, we recommend working with only one clay type at a time. Keeping the clay bodies separate from one another and free from contamination is important to maintain overall quality. Clean your tools and wheel thoroughly when switching types.
More technical information about clay is available here.
Clay Access: Brown stoneware is always available at no charge. New and recycled clay is located in blue plastic barrels under the studio chalkboard. After you take some clay, be sure to replace the barrel lid immediately so that the remainder of the clay inside will remain moist. If barrel clay is low or empty, a studio potter can bring bagged brown stoneware out from our storeroom.
The other clay bodies are available in two ways:
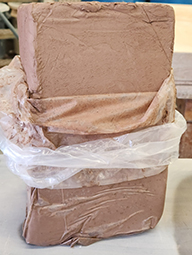
- For sale in 25 pound bags. After purchase, this clay becomes your personal property and needs to be stored on your shelf. The clay charge per bag is $24.00 for white stoneware, $21.00 per bag for dark Miller 75 stoneware, $28.00 per bag for porcelain and $22.00 per bag for terracotta. If desired, you can also purchase bags of brown stoneware for $21.00 per bag.
- There are recycle barrels for each type of clay near the sink. Clay may be used from these bins for no charge. You may, or may not, choose to recycle your purchased clay here.
Reclaiming Brown Stoneware: Clay should be re-wedged and placed in the blue barrel for reusable brown stoneware. If the clay is too dry, wet it and re-wedge it. If the clay is too wet, spread it out on the reclaiming plaster bat to dry, and then re-wedge it. Be sure to put your reclaimed clay in the appropriate barrel to avoid contaminating a different clay body. Return reclaimed clay in the condition in which you would like to find it.
Recycling Clay. If you cannot reclaim your clay for some reason or you simply wish to recycle it, then place it in the correct recycle bucket for its clay type. Only throw slurry and clay which has dried to leather hard or bone dry into the recycle buckets. For brown stoneware, the recycle barrel is the same size and color as the useable clay barrels, so please look carefully to avoid dumping slop into the good clay.
Contaminated Clay
Not all clay can be recycled. For example, if different clays have been mixed together, colored slips or oxides have been added to the clay, foreign matter has contaminated the clay, and so on, then the clay is no longer recyclable and needs to be discarded. Please do not wash contaminated clay down the sink. Rather, put it into a plastic bag, seal or tie it closed, and dispose of it in the clay trash can near the kiln room door.
Trimmings that have fallen on the floor may or may not be contaminated. Use your best judgement on whether they should be recycled or trashed. Please err on the side of caution.
Firing
In order to produce a finished piece of pottery, the clay must be fired twice:
- An initial bisque firing stabilizes the piece by removing moisture from the clay. This enables the piece to be glazed (if desired). This firing takes place at a lower temperature than the final firing. In the CAW pottery studio, bisque firings at done at cone 06.
- A second glaze firing permanently bonds the glazed to the clay surface. In addition, the clay itself undergoes chemical changes as it transforms into its final form.
Firing fees. CAW charges a fee for firing your pieces in the pottery studio kilns, payable when you submit your piece for bisque firing:
- For brown stoneware and all clay reclaimed from recycle barrels (i.e., free clay): $2.75 per pound.
- For purchased white stoneware, porcelain and terracotta: $2.25 per pound.
There is no additional charge for glazes or glaze firing.
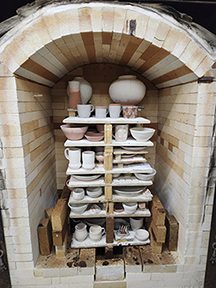
Note that there are separate shelves for stoneware & porcelain, terracotta and sculpture on the greenware rack, which is located to the left as you enter the ware room. Pieces waiting for glaze firing are placed on the shelves opposite the sink for high fire clays and the ones to the left of the door for terracotta.
Preparing pieces for bisque firing. Generally, it is best to let your work dry on ware boards rather than on bats. Greenware should not be removed from your storage shelf until it is “bone” dry: completely dry and at room temperature. Mark the bottom of each piece with your initials or other symbol. It then can be weighed, paid for and placed on the greenware rack for firing.
If you’ve stuffed paper inside your piece for support while drying, please remove it before firing. Firing paper-filled pieces in the electric kilns creates smoke in the kiln room and is harmful to the kiln elements.
Storing bisque ware. Once bisqued, ware should be promptly removed from the bisque rack and stored back on your shelf. Looking for and storing your work each time you visit the studio will help create the space needed for new pieces coming out of the kiln.
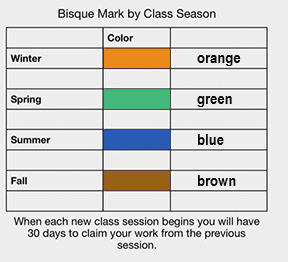
Studio potters mark each piece with a color dash on the bottom to date the ware by term (Spring, Summer, Fall, Winter) according to this chart. The color mark burns off in the high fire, so it won’t affect your final piece regardless of how you glaze it.
Thirty days after the beginning of each term, all previous semester bisque will be cleared-out in order to make space. They will be displayed with a notice for a short while on one of the studio roll-a-way carts.
Glaze firing. Once glazed, your ware can be placed on the glaze fire racks to the right in the glaze room. Studio potters inspect each piece for glaze quality while loading the kiln. Your piece may be rejected and placed on the reject side of the rack with a note. Check the reject shelves for pots with glaze issues: i.e., glaze on bottom of pot, glaze chipped, glaze too thick, and the like.
After glaze firing, finished pieces are placed on the shelves on the left in the kiln room. Please check for and remove your pieces as soon as possible. Each piece is identified with a unique sticker as it comes out of the kiln that identifies the firing date.
If you are unable to glaze all of your work before the end of the term and you are not re-registering, you may glaze your work during the first two weeks of the next semester, in any practice session.
If you do not wish to take your finished work home, then discard it or donate it to the studio for sale as a Second. Please do not abandon your ware. Unclaimed pieces cannot be held indefinitely, and will be discarded or sold periodically.
Food Safety
Food safety for pottery is determined by a number of factors: glaze and clay maturity, glaze melt, glaze fit, and the solubility or stability of fired glaze materials. Non-food-safe glazes are so designated because they are either unstable in the fired state and thus may leach metal oxides into foods, especially acidic foods/liquids, or because they have a crazed glaze surface where bacteria can become lodged and grow.
All cone 10 gloss glazes at CAW meet the definition of “food safe” as long as they remain uncrazed. In other words, the glossy glazes are chemically stable and contain no lead or other soluble toxic materials.
In contrast, matte glazes are not recommended for use on surfaces that will come into contact with foods because their surface quality is achieved essentially by under firing, which can leave them unstable.
Avoiding Damage
Student ware has to be placed out on open racks for firing and glazing. Please do your best to avoid damaging anyone else’s ware:
- Slide greenware over only from the base of the piece. Never pick it up by the rim or handle. If possible, don’t handle or move other student’s greenware at all.
- Be sure your piece is completely dry before submitting it for bisque firing; damp ware can explode and damage the kiln, kiln shelves and other ware.
- Do not attempt to “once-fire” raw clay in our glaze kilns; it may also explode.
- Be careful not to chip or smudge other’s glazed ware when putting your piece on the glaze-fire rack. Lift bisque ware from the waxed base if possible, but never pick a piece up by its handle.
- Avoid touching anyone’s ash application because you will leave a fingerprint in the design.
- Remove and return the bat from your work as soon as you can.
If you do damage another person’s work, please have the courtesy to leave a signed apology on top of the piece.
Glazing
The studio provides 14 standard glazes for general use with high fire clays:
| Ben’s Amber Blue Celedon Dunham’s Blue Geoff’s Copper Red Gloss White | Jasper Tan Midnight Blue Old Yellow Peter’s Black Randy’s Green | Satin White Matte Shaner’s Red Shino Tenmoku |
Batz Majiolica (white) is also provided for terracotta pottery decorated with the Majolica technique.
Other, “advanced” glazes are also available.
For best results, prepare your pots and the glaze mixture properly before glazing:
- Wipe with a damp sponge.
- Wax the foot of your pots, or the bottom and lower 1/4″ for ones without a foot, as well as any other parts where you don’t want glaze (e.g., the inner lid and part of the body that the lid touches).
- Mix the glaze thoroughly with a stir stick before every use. Mix longer than you think you need to. Glazes that have not been used recently may need to be mixed with the drill mixing attachment for best results.
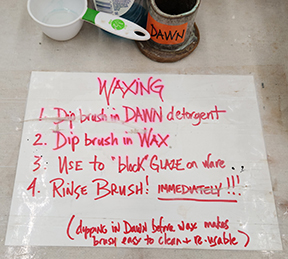
- After waxing, cover the wax container, and clean the wax brush with hot water.
- After glazing, please put the lids back onto the correct buckets. Accidentally applying a glaze you didn’t want because the wrong lid was on the bucket is heartbreaking.
Hints and warnings will be posted around the glaze area from time to time. Be on the lookout for them.

Too Thick or Too Thin?
Do not add water to glazes. If you think a glaze needs thinning, check with your instructor or a studio potter.
If you think a glaze is too thin, remove the top layer of water, but do not discard it. Stir the glaze, apply it to your pot, and then return the removed liquid back to the container.
Studio potters are always happy to help you with glazes.
Preventing Glaze Running onto Kiln Shelves
Glaze applications that run onto the kiln shelves leave a big mess and major headaches in their wake.
- Be sure to wipe off the bottom of the pot and the lower 1/4″ (waxing alone is not enough).
- Design the foot of your pot with glaze run prevention in mind.
- Apply a single dip of one glaze.
- If double dipping or applying one glaze on top of another, try it on the inside or rim of the pot
- Be aware of those glazes that are particularly runny and exercise care: turquoise, purple haze, apple green, opalescence, Geoff’s copper red are some common ones.
- Vertical forms with thick glaze are more prone to running.
- Porcelain is more susceptible too running.
To reduce glaze runs and damaged shelves, studio potters screen glazed pots when loading kilns and enforce a rejection policy for pots which are suspected of unacceptable glaze applications. Rejections will be marked with reasons and dates and be placed in designated reject shelves. Faculty members should check with students on rejects regularly, especially for “missing” pots, and to ensure students are glazing properly.
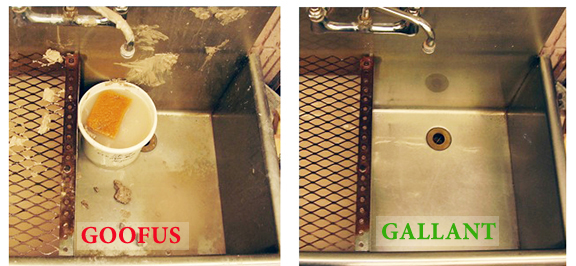
Cleanup
Each student is expected to help keep the studio orderly and clean. Dust from clay and glazes can be hazardous when inhaled or ingested, so we consider cleanup a very important part of pottery education. Clean up must take place within the scheduled class or practice time.
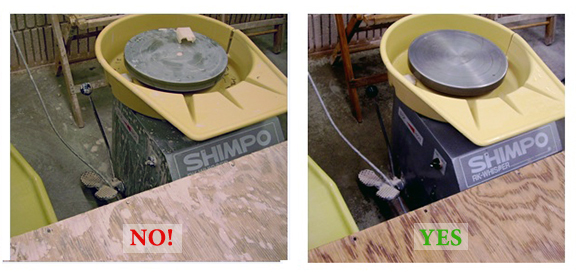
Each student should clean their wheel, the floor area around the wheel and the tool bench in front of the wheel. Also, clean up any common areas you have used, including the sinks, the wedging table and its clay cutting wires, the main work table and the floor under it, and so on.
After glazing pots, wash the glaze table, stirring sticks and drips that fell onto the floor. Drips always fall onto the floor.
Finally, clean any studio tools you use—bats, wedging board, ware boards, etc.—and return them to the proper storage area. Plan on allowing 5-10 minutes at the end of each session for cleaning.
Different clays are used in the studio. Clean up so the next person can use a different kind of clay without finding any residues of your chosen clay.
Faculty and studio potters may delegate responsibilities to ensure a complete cleanup of the pottery after each session. Studio potters often do additional cleaning after a session to improve the condition of the studio. However, they are not janitors hired to clean up after you. Keeping the studio clean and safe is everyone’s responsibility.
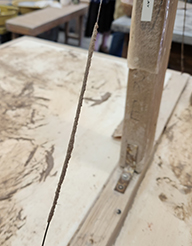
Don’t forget the wedging table’s clay cutting wire!
Health, Safety & Security
If you have a specific health concern related to your work in the pottery, you should consult with your medical professional.
The following list identifies some of the hazards associated with the pottery studio that you might not be aware of:
- Dust. If spilled clay is not cleaned up promptly, it quickly dries to become fine dust which easily stirs into the air as people walk around the studio. The silica in clay and the metal oxides in glazes can be toxic when inhaled over time. Dust particles settle on all uncovered surfaces, including food plates and drink containers, creating an ingestion risk. For these reasons, the studio needs to cleaned as needed, with everyone doing their part. In addition, sanding or grinding of pieces should be done outside rather than inside the studio.
- Long hair and rotating machinery: Students with long hair should tie it back so that it can’t get tangled into the pottery wheel while it’s spinning. The same considerations apply to power mixers, grinding tools, and other tools that spin at high speed. Also, some of the wooden bats are wide enough to pinch your hands against the splash pan and/or give you a sliver while they are in motion.
- Sharp tools in slop buckets or clay barrels: Be careful inserting your hands into the center sinks or any standing slop buckets because they can contain sharp tools (razors, needles, knives) pointing upwards. Sharp items such as glass shards and needle points have also appeared in the clay periodically.
- Kilns: The surface of the kilns is very hot while they are firing and during most of the cooling cycle. Since the kiln temperature may not be apparent, students are cautioned to keep a distance unless they are sure they are cool.
- Sharp edges on fired ware: Use care when picking-up or sliding ware around in the ware cabinet because some pieces may have very sharp edges around the foot. This happens when glaze is applied too thickly and runs off the pot during firing. The piece has to then be broken away from the kiln shelf to unload it, producing a sharp glass wedge.
- Extruder handles: The extruder includes handles formed from metal pipes that can protrude into the travel area near the wedging table while the extruder is in use. They are not very noticeable and sit about the height of one’s forehead.
The following items are examples of situations where everyday common sense will serve you well in the pottery studio. This list is not exhaustive.
- Eye protection is not optional: Do not use the studio grinder or Dremel tool without wearing the head mask or suitable eye protection.
- Accessing upper shelves: Use the step ladders provided by the studio to reach upper storage shelves. Do not stand on chairs, stools, wheels, benches, or other shelves to reach high areas since they are not stable.
- Slipping on wet floor: Spillage at the sink during cleanup can leave the floor slippery. Proceed with caution whenever the floor appears wet.
- Tripping over obstacles: Brooms, mops, glaze buckets, mop pails are used by multiple students and may not be stored completely out of the travel path you’re used to. Each student should be sure to keep the aisles clear, but please be sure to keep your eyes open all the time to avoid tripping hazards.
Security
People from the general public periodically visit CAW and are free to enter the studio. No one particularly monitors their actions. Please be careful and aware of your belongings to protect against theft. A “Lost & Found” for the school is located in the front office.
Visitors to the patio door: Use your discretion before opening the patio door to strangers. If you have a concern, direct them to the front entrance of the school where staff is available to help them.
The patio door self-closes and self-locks. Blocking it open is generally not advised from a security standpoint. Besides pottery students, no person, student or otherwise, should be given access to the building.
Practice Time
Each student is entitled to three hours of practice time each week during the term. A studio potter will be there to open the studio, monitor the practice and clean-up, assist students when asked, sell tools and close at the scheduled times. Each semester, the studio potters make a flyer listing the times available for practice and put a stack of them on the center table.
Students may work only during the scheduled practice hours listed on the Home page. Practice time cannot be accumulated from week-to-week. Practices are offered on a first-come, first-served basis.
Wheels and work areas should remain available for as many people as possible and should not be occupied or held unless they are actively being used.
Although you may have a favorite wheel, you should become familiar with the other types in the studio, because your usual wheel may be occupied when you arrive for practice.
Wheels cannot be reserved. No one has any rights to a specific wheel or location because they usually use it. While you are actively using a wheel, you cannot be bumped from it until you clean up and leave it to glaze or do other work.
Please do not bring visitors, non-students, children or pets to work with you in the studio. Only students who are registered and instructor-trained are entitled to use studio equipment.
Practice time may be preempted for special workshops; such changes will be posted on the home page practice schedule and on the chalkboard in the pottery studio.
Practice time may be preempted for special workshops, weather-related closings and other rare events, sometimes short notice, so it’s always best to check the online practice schedule.